
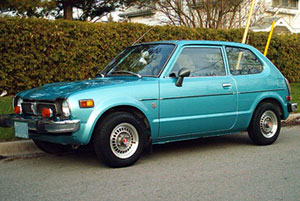

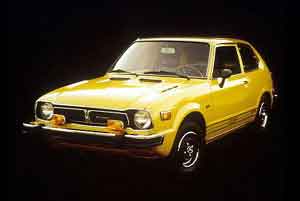

Project Phil's 1975 Honda Civic 1200
-
Phil
- Projects

- Posts: 65
- Joined: November 30th, 2018, 3:58 am

- Province/State: SA
- Model: 1975 Hatchback
Re: Phil's 1975 Honda Civic 1200
I've been putting this off for a while and there's no better time than now to catch you all up on what i've been up to.
The Rear Bumper
One of the saddest looking parts of the car was in need of a good restoration.
I decided to go a little further than the front bumper. I took off the bumper and separated all the bits from the main 'chrome' part and proceeded to clean with a decent car wash. I Spent a good day wire wheeling out all of the old paint/rust/yuck and applied a rust converter, which revealed a bruised 'purplish' black colour after I let set for 30 mins. Followed by a wipe with a damp cloth and some mineral turps.
After rust treatment, I chose to fill the existing two holes in the centre of the bumper with fibreglass from the inside edge. This was my first time using fibreglass, so I was pleased to see it worked out alright. Following up the fibreglass process, body filler was used to finish the job on the outside edge.
Next up was a good sand before moving onto painting the inside with equipment enamel (cheap and nasty industrial paint) works a charm. I'm in the shed to avoid the high wind!
Annnnnd out to bake
The following day I tackled the outside edge. A quick go over with the clay bar removed the majority of non essential sap and other crap from the bumper.
Let the taping Begin! This process, as last time takes a good effort of eye-tape coordination. The result only comes out as good as your preparation!
Again i'm using the same satin black 2k mix as the front bumper. I was really pleased with the shade last time.
Last but not least, the other bits... All hardware replaced with stainless steel options from united fasteners, just like the front bumper.
The Rear Bumper
One of the saddest looking parts of the car was in need of a good restoration.
- before
- rust treated
- fibreglassed holes
- body filled
- inside painted
- baking outside in the sun
Let the taping Begin! This process, as last time takes a good effort of eye-tape coordination. The result only comes out as good as your preparation!
- taped!
- peel and reveal
- final assembly
-
Phil
- Projects
- Posts: 65
- Joined: November 30th, 2018, 3:58 am
- Province/State: SA
- Model: 1975 Hatchback
Re: Phil's 1975 Honda Civic 1200
Rear louvre removal and Rear number plate mounting plate removal
Heading into winter I decided it was time to remove the rear louvre, as rear vision is a current priority. I started off by prying around the outside edge carefully using a plastic trim removal tool, which worked well and made removal fast. The more tedious part was removing the remainder of the silicone. With a mix of 1hr worth of labour, WD40, razorblade and dishwashing liquid mix for lubricant, I successfully cleaned rear windscreen.
While I had the trim removal tool out, I removed the Hondamatic badge and the CiViC badge. One will no longer exist and one will be restored... I'll let you guess.
Removing the rear number plate mounting plate was a much simpler job. Sticking my hand into the wiring cavity was the first step and disconnecting the number plate lights. I then proceeded by removing the inside rear plastic panel, which exposed the nuts. From memory these were 4 10mm nuts, off with the socket and the mounting plate released to reveal a very rusty backside.
Number plate re-drilled to suit the existing holes, bolted in and I was off for a test drive. I have to say I do quite like driving with the louvre removed.
Heading into winter I decided it was time to remove the rear louvre, as rear vision is a current priority. I started off by prying around the outside edge carefully using a plastic trim removal tool, which worked well and made removal fast. The more tedious part was removing the remainder of the silicone. With a mix of 1hr worth of labour, WD40, razorblade and dishwashing liquid mix for lubricant, I successfully cleaned rear windscreen.
While I had the trim removal tool out, I removed the Hondamatic badge and the CiViC badge. One will no longer exist and one will be restored... I'll let you guess.
- Louvre
- Louvre off
Number plate re-drilled to suit the existing holes, bolted in and I was off for a test drive. I have to say I do quite like driving with the louvre removed.
-
Phil
- Projects
- Posts: 65
- Joined: November 30th, 2018, 3:58 am
- Province/State: SA
- Model: 1975 Hatchback
Re: Phil's 1975 Honda Civic 1200
Rear number plate lights
In my last instalment, I left you looking at some green tape on either side of the number plate. This is to be where my rear number plate lights will sit. a little measuring with the eye and marking the body with the light bolts gave me a good place to start.
Once I had my marks I took the rear interior panel, checked for potential obstructions and drilled all the way through the body (2mm?). Picking up the lights again, I noticed my drill holes were a little bit off, so I took to the file and filed away to correct my mistakes. I was finally happy with the positioning and added washers and nuts to the interior side. Not to forget the wiring too!
In my last instalment, I left you looking at some green tape on either side of the number plate. This is to be where my rear number plate lights will sit. a little measuring with the eye and marking the body with the light bolts gave me a good place to start.
- Find the centre
- lights attached
-
Phil
- Projects
- Posts: 65
- Joined: November 30th, 2018, 3:58 am
- Province/State: SA
- Model: 1975 Hatchback
Re: Phil's 1975 Honda Civic 1200
RS tacho test
I was happy to get home from work and find my Tacho drive cable had arrived from Blackbullet (Jay) in the UK. Even more excited to test it out with positive results!
Wheels
As some of you may have already guessed, i'm somewhat partial to the 1200 RS. Wheels are not an exception here. My mission to start with, was to hunt down some paint and this wasn't hard. I went back to All Paints and they provided me some lovely satin black 2k paint, along with some primer. I'm a big fan of the 2k paint, it's extremely hard wearing stuff.
I've painted wheels before and the biggest lesson i've learned is prep prep prep makes or breaks the result. Without exaggurating, I spent a good 6 hours prepping these wheels before thinking about paint.
I started off by prying off the chrome rings with a screwdriver off the 1st gen Accord stock wheels and blasting them with the high pressure hose. Good start, but not nearly enough to suffice. Degreasing was next, lots of scrubbing, then rinsing, then scrubbing and rinsing again (you get the point). Here we are, finally at the wire wheeling process to remove all the surface rust from the work, because we all hate rust. Next came the sanding - #320, #400, #600, #800. We're finally getting there. another thorough clean with a little car wash, high pressure hose and a good few hours to dry in the sun. We're nearly at paint, I promise. Into the shed to fetch the wax and grease remover and another detailed wipe down of all the surface areas with a clean microfibre cloth.
I nearly forgot about the beauty rings. They were dealt with using a little bit of Autosol and a soft microfibre cloth. The best result I could obtain without stripping them and re-chroming.
Lucky I found a bunch of newspaper, as I ended up wrapping and stacking my wheels in it for painting.
And I removed the newpaper/tape and put them in the sun to bake.
Followed by Beauty rings 5 days later.
I was happy to get home from work and find my Tacho drive cable had arrived from Blackbullet (Jay) in the UK. Even more excited to test it out with positive results!
- tachometer test
As some of you may have already guessed, i'm somewhat partial to the 1200 RS. Wheels are not an exception here. My mission to start with, was to hunt down some paint and this wasn't hard. I went back to All Paints and they provided me some lovely satin black 2k paint, along with some primer. I'm a big fan of the 2k paint, it's extremely hard wearing stuff.
- spare wheels on the car while painting my accord stockies
I've painted wheels before and the biggest lesson i've learned is prep prep prep makes or breaks the result. Without exaggurating, I spent a good 6 hours prepping these wheels before thinking about paint.
I started off by prying off the chrome rings with a screwdriver off the 1st gen Accord stock wheels and blasting them with the high pressure hose. Good start, but not nearly enough to suffice. Degreasing was next, lots of scrubbing, then rinsing, then scrubbing and rinsing again (you get the point). Here we are, finally at the wire wheeling process to remove all the surface rust from the work, because we all hate rust. Next came the sanding - #320, #400, #600, #800. We're finally getting there. another thorough clean with a little car wash, high pressure hose and a good few hours to dry in the sun. We're nearly at paint, I promise. Into the shed to fetch the wax and grease remover and another detailed wipe down of all the surface areas with a clean microfibre cloth.
I nearly forgot about the beauty rings. They were dealt with using a little bit of Autosol and a soft microfibre cloth. The best result I could obtain without stripping them and re-chroming.
- beauty rings?
- pre-primer
- primer - 2 coats
- satin black - 1 dust coat, 2 medium coats and one final coat
- baking wheels
- beauty rings on the wheels
- On the car
-
Phil
- Projects
- Posts: 65
- Joined: November 30th, 2018, 3:58 am
- Province/State: SA
- Model: 1975 Hatchback
Re: Phil's 1975 Honda Civic 1200
Honda Badge and Glovebox touch up
You've probably already guessed, but yes the Hondamatic badge was the weakest link. So I got started on cleaning up my CiViC badge and laid down one strip of painters tape (I swear by the Frog Tape brand for clean lines).
I painted the badge in a matt black, which in hindsight I should have chosen a satin black. Only 2 coats of paint here, didn't want to overlay it too thick and kill the accents. Ruby red resin was the next step, a careful art of resin vs toothpick.
Another thing that has been urking me is the toxic blue metallic colour that the original owner had introduced to this car (valve cover and glovebox alike ). A bit of careful sanding and fine paintbrush work yielded a better result.
You've probably already guessed, but yes the Hondamatic badge was the weakest link. So I got started on cleaning up my CiViC badge and laid down one strip of painters tape (I swear by the Frog Tape brand for clean lines).
- surgical scalpel time
- green civic badge
- finished civic badge
Another thing that has been urking me is the toxic blue metallic colour that the original owner had introduced to this car (valve cover and glovebox alike
- toxic blue
- subtle silver
-
mielko

- Projects
- Posts: 347
- Joined: January 5th, 2010, 12:39 pm

- Province/State: Europe,holland
-
Phil
- Projects
- Posts: 65
- Joined: November 30th, 2018, 3:58 am
- Province/State: SA
- Model: 1975 Hatchback
Re: Phil's 1975 Honda Civic 1200
Reverse lights in the 3rd person
On one relatively sunny windy typical Adelaide day, Phil decided to check the condition of his reverse lights. Loosened a few bolts and he disconnected the wiring and the lights were free. To his dismay, they were rusty and untrusty.
Phil put his redback resistant gloves on and went out to the parts shed. A choice of a few daggy looking reverse lights, with some usable bits caught his gaze. Back at the work bench, he laid down the options and tried to make a decision... 'chrome and holey or whole and no chromey?' He pondered this option for a while and settled on chrome and more repair work.
Phil's planning on fibreglassing and body filling, useful skills that are bound to be repeated in the coming years. However he needed to do the prep work before tackling the task, this involved wheel wheeling, rust treating and sanding.
he's made it, he's finished with prep work!
Phil zipped off to the local auto supply store in his mazda 6 wagon and picked up some fibreglass and body filler. He had organised to pick this up earlier on the phone via contactless click and collect.
back at home, mask on and into the fibreglass instruction manual he dove! First, Resin 50mls to 20-40 drops of catalyst dependent on weather conditions. The temperature was halfway between warm and cold, so he decided that 30 drops was the sweet spot. Right! Phil laid a piece of painters tape along the back of the light to give the fiberglass something to cling onto. Cut up some little squares out of the fiberglass matting and proceeded to add a few dabs of mixture to the inside of the reverse light porous steel substrate. Laying down small pieces carefully he slowly filled up the gaping jagged hole, adding layer by layer to ensure structural rigidity of the abused item. He had to leave this one for a few hours, so he diverted his attention to the brackets.
Phil got back on the wire wheel and shredded the hell out of the remaining paint on the brackets. He followed this up with friendly rust treatment, time, primer and black paint.
The rest of the components had not escaped Phil's attention. He managed to polish up the outside faces for a decent shine and paint the remaining parts that were previously rust treated.
A little bit of body filler + more paint and Phil is nearly there. He won't have the prettiest looking lights, but they will be a vast improvement over what once was.
On one relatively sunny windy typical Adelaide day, Phil decided to check the condition of his reverse lights. Loosened a few bolts and he disconnected the wiring and the lights were free. To his dismay, they were rusty and untrusty.
- rust
- rust2
Phil's planning on fibreglassing and body filling, useful skills that are bound to be repeated in the coming years. However he needed to do the prep work before tackling the task, this involved wheel wheeling, rust treating and sanding.
- new choice
back at home, mask on and into the fibreglass instruction manual he dove! First, Resin 50mls to 20-40 drops of catalyst dependent on weather conditions. The temperature was halfway between warm and cold, so he decided that 30 drops was the sweet spot. Right! Phil laid a piece of painters tape along the back of the light to give the fiberglass something to cling onto. Cut up some little squares out of the fiberglass matting and proceeded to add a few dabs of mixture to the inside of the reverse light porous steel substrate. Laying down small pieces carefully he slowly filled up the gaping jagged hole, adding layer by layer to ensure structural rigidity of the abused item. He had to leave this one for a few hours, so he diverted his attention to the brackets.
- glass
- glass2
- brackets
- Attachments
-
-
-
Phil
- Projects
- Posts: 65
- Joined: November 30th, 2018, 3:58 am
- Province/State: SA
- Model: 1975 Hatchback
Re: Phil's 1975 Honda Civic 1200
Where to start, where to begin! the forum is indeed back!
As you may have guess I have been busy. Let me think about where to start...
As you may have guess I have been busy. Let me think about where to start...
-
Phil
- Projects
- Posts: 65
- Joined: November 30th, 2018, 3:58 am
- Province/State: SA
- Model: 1975 Hatchback
Re: Phil's 1975 Honda Civic 1200
It's good to finally get this off my chest and onto the digital paper.
Best to start where we left off, The twin rs keihns. Completely stripped down, cleaned out all my jets using throttle body cleaner and welding tip cleaners (awesome in the smaller holes :) ). Diaphragms in servicable condition.
After a failed attempt to get one carburetor shop to clean my bodies, I tried another that eventually decided it was worth his time. He lent me his knowledge in how to clean properly and how to clear blocked jets (Mini drill bits). I left the bodies, float bowls and hats with North East carburetor Service for a week while they chemically cleaned them out. I was really pleased with the result, especially the way the hat and needle actuated after the treatment.
Best to start where we left off, The twin rs keihns. Completely stripped down, cleaned out all my jets using throttle body cleaner and welding tip cleaners (awesome in the smaller holes :) ). Diaphragms in servicable condition.
-
Phil
- Projects
- Posts: 65
- Joined: November 30th, 2018, 3:58 am
- Province/State: SA
- Model: 1975 Hatchback
Re: Phil's 1975 Honda Civic 1200
I've also been preparing for more RS parts to arrive - Front indicators, side indicators, front and rear badges and an accelerator pedal, Which I say a special thank you to Hiroshi in Nagoya Jp.
A little bit of metal fabrication coming into play here... let's start with my original front apron panel. It had a beautiful big old rusty hole in it, which made it the perfect candicate to chop.
I cut the indicator mounting point off and linished it back with the flap disk. The theory was to use the old panel for the new RS front indicators. I removed the original skin, created a template to match each side using 0.8mm mild steel sheet and tack welded them on. I have also cut patch panels to cover the gap (more fine tuning is required before welding these on). Definitely work in progress as my time has been scattered around other parts of the car.
A little bit of metal fabrication coming into play here... let's start with my original front apron panel. It had a beautiful big old rusty hole in it, which made it the perfect candicate to chop.
