So you tryin to win that overhead console on ebay eh
| By Kyle Thomson (24.83.30.135) on Wednesday, July 13, 2005 - 04:52 pm: |
I think its a battle of the people with broken clocks =) Mine doesn't work either =(
| By nathan (24.85.232.159) on Wednesday, July 13, 2005 - 08:34 am: |
nice shot! -thanks...
So you tryin to win that overhead console on ebay eh ![]() Don't you have one already
Don't you have one already ![]() hook a brother up...
hook a brother up...
| By Kurt (205.250.99.236) on Tuesday, July 12, 2005 - 10:52 pm: |
From reading the instructions again if you can find a better white background meterial let me know. The presentation binders are a little flimsy and have found the vinyl does not sit perfectly straight. Something harer/firmer yet translucent would work much better. Christine - your the craft guru any suggestions ?? ![]()
I should also mention the indiglo look as a little welfare then the real thing but they do illuminate white and are super clear at night.
Here they are at night....
| By Kurt (205.250.99.236) on Tuesday, July 12, 2005 - 10:45 pm: |
Here are my instructions as they are on http://www.1stgencivic.com :
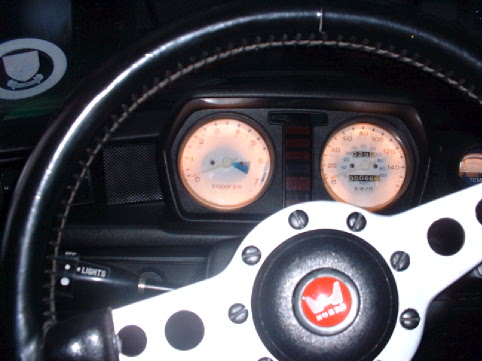
Start by disassembling the original gauges and carefully removing the needles. Make a note of where the needles sat at '0' because they usually sit just a little below the '0' on the gauge face. This is important for accuracy when they are reassembled.
The gauge faces were then scanned and uploaded to Photoshop. I tried using Paint through Windows but its not advanced enough - stick with Photoshop.
The image of the gauge faces then have to be shrunk down to size so they are exactly the same size as the stock blue ones. For some reason the scanners never seem to scan them to the exact size. Have tons of paper in your printer to print off some samples until you get them right.
Once the size is correct then go into the tools menu in your photo program and 'reverse' the colour. The dark blue face will turn out white (or clear when printed), the numbers black and the red will turn blue. If your faces had some blemishes on them when they were scanned this will turn up as well but can be fixed up or removed by using the 'edit image' option in the Photo program.
Once you are happy with the image they can be printed out on ordinary paper to make sure they turned out right.
Now your ready to print off the faces. I chose to use 'inkjet friendly' clear overhead projector plastic sheets. This is important because if you try using regular clear sheets the ink will just run off. These can be bought at any stationary store such as Staples or Office Depot. Once these are printed just cut the gauge faces out.
Now you need the white backgrounds. You could do the whole thing on white card stock but the light will not shine through. I ended buying white presentation binders from Office Depot and using the white vinyl from those. The vinyl is clean enough for a clean white background but is thin enough for light to evenly penetrate it. All you have to do with these is trace them out and cut them the same size as the gauge faces.
Using a sharp exacto knife cut out the slots for the trip, odometer, needle hole and screw holes in the clear overhead sheet and the white vinyl. The places to cut are easy to find as they will show up when you scanned the faces.
Now place the clear gauge faces you printed off on top of the white vinyl. You can use contact cement to attach the two together by gluing just the edges (gluing anywhere else will show the glue) or using thin strips of scotch tape around the outer edge. If you stick to the edges you will not be able to see the tape once they are assembled. I went with the tape
To try and hide some of the hardware (gears, cogs etc.) behind the speedometer and tachometer I cut out some circles out of thick card stock to place behind the vinyl so that light would not penetrate this area. You don't have to do anything with temp and fuel gauges.
Now put the gauges back together and enjoy. You may have to play with them a few times to make sure everything sits flush.
I ended up using thin white vinyl sheeting for my gauge background to obtain a clear look when the light shines through. I then cut out some circles with thicker card stock to block the hardware behind the face. I am still using the stock bulbs but with the white vinyl and it gives it an appearance similar to the Indiglo gauges only its not as bright.
| By farenheight101 (24.69.255.203) on Tuesday, July 12, 2005 - 04:30 pm: |
I think Kurt used Photoshop, scanned the guages, and reversed the colors.
| By nathan (24.85.232.159) on Tuesday, July 12, 2005 - 11:28 am: |
I think I read on http://www.roadsailing.com (Kurt's site) that it was Photoshop? he used Maybe it was on http://www.1stgencivic.com either way, you should be able to draft up your own...just trail and error, create your file, print, hold it up, adjust accordingly...besides then you can customize yours to be different...
I would love to see what Kurts looks like at night....
| By jms (143.79.13.6) on Tuesday, July 12, 2005 - 07:54 am: |
what program did you use, I tried some on pwer point and they look bad, let me know what material you used and where you got it, how you did it etc, thanks.
| By Kurt (205.250.99.236) on Monday, July 11, 2005 - 06:24 pm: |
unfortuantely I no longer have the files or the program anymore. If I ever do another set I will post the file somewhere.
| By DaRk (66.50.181.42) on Wednesday, July 06, 2005 - 12:10 am: |
same here ![]() "sinful_death1 at hotmail dot com"
"sinful_death1 at hotmail dot com"
| By jms (68.19.246.231) on Tuesday, July 05, 2005 - 07:18 pm: |
anyway I can get those guages or that file from you?
| Administrator's Control Panel -- Board Moderators Only Administer Page |