| By hot_striper (200.50.0.106) on Thursday, October 21, 2004 - 04:52 pm: |
Hello
I from Puerto Rico. I like this dash please send
this info to:hot_striper03@yahoo.com
| By Shane (207.6.123.86) on Wednesday, March 10, 2004 - 07:00 pm: |
Hey Kurt I want those guages! Did you find the scanned files? Mabey you can e mail em to me if you did? sunkistcivic@hotmail.com Shane
| By 78honda (209.121.84.36) on Sunday, March 07, 2004 - 06:17 pm: |
Brian, could you send me one too!
| By DåRl{ (66.50.181.15) on Tuesday, March 02, 2004 - 07:39 pm: |
Ok...Thanx.![]()
| By Kurt (142.179.34.133) on Tuesday, March 02, 2004 - 12:00 pm: |
Its actually fake - its a sticker ![]() . Its made by a company called Factory Effex. They produce graphic kits and number plate backgrounds for dirt bikes.
. Its made by a company called Factory Effex. They produce graphic kits and number plate backgrounds for dirt bikes.
In this case you buy a package for about $20 US and it comes with two 12" x 18" faux carbon fibre sticker sheets. One package is enough for a ew cars. They are extremely high quality and are made by 3M. They have to be durable to withstand the water, mud and crashes that dirt bikes are put through.
There website is here:
http://www.factoryeffex.com/home.html?377,375
click under on line store and then carbon fibre. They can also be found at any motorcycle dealer
Fx Part # 02-6606
| By DåRl{ (66.50.182.98) on Tuesday, March 02, 2004 - 11:21 am: |
Kurt , where you get that Carbon Fiber to cover up the woodgrain? Thanx.
| By Kurt (207.6.125.193) on Saturday, February 07, 2004 - 03:02 pm: |
So I here is how I built my white face gauges...The secret is out ![]()
I started by disassembling the original gauges and carefully removing the needles. Make a note of where the needles sat at '0' because they usually sit just a little below the '0' on the gauge face. This is important for accuracy when they are reassembled.
The gauge faces were then scanned and uploaded to Photoshop. I tried using Paint through Windows but its not advanced enough - stick with Photoshop.
The image of the gauge faces then have to be shrunk down to size so they are exactly the same size as the stock blue ones. For some reason the scanners never seem to scan them to the exact size. Have tons of paper in your printer to print off some samples until you get them right.
Once the size is correct then go into the tools menu in your photo program and 'reverse' the colours. The dark blue face will turn out white (or clear when printed), the numbers black and the red will turn blue. If your faces had some blemishes on them when they were scanned this will turn up as well but can be fixed up or removed by using the 'edit image' option in the Photo program.
Once you are happy with the image they can be printed out on ordinary paper to make sure they turned out right.
Now your ready to print off the faces. I chose to use 'inkjet friendly' clear overhead projector plastic sheets. This is important because if you try using regular clear sheets the ink will just run off. These can be bought at any stationary store such as Staples or Office Depot. Once these are printed just cut the gauge faces out.
Now you need the white backgrounds. You could do the whole thing on white card stock but the light will not shine through. I ended buying white presentation binders from Office Depot and using the white vinyl from those. The vinyl is clean enough for a clean white background but is thin enough for light to evenly penetrate it. All you have to do with these is trace them out and cut them the same size as the gauge faces.
Using a sharp exacto knife cut out the slots for the trip, odometer, needle hole and screw holes in the clear overhead sheet and the white vinyl. The palces to cut are easy to find as they will show up when you scanned the faces.
Now place the clear gauage faces you printed off on top of the white vinyl. You can use contact cement to attach the two together by gluing just the edges (gluing anywhere else will show the glue) or using thin strips of scotch tape around the outer edge. If you stick to the edges you will not be able to see the tape once they are assembled. I went with the tape
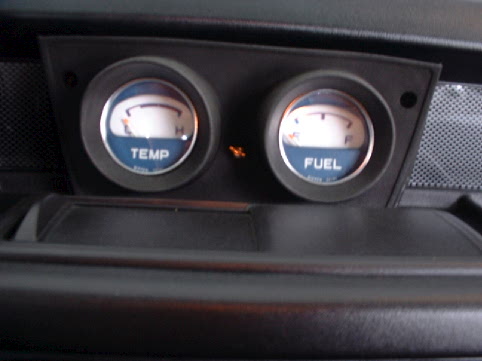
To try and hide some of the hardware (gears, cogs ect.) behind the speedometer and tachometer I cut out some circles out of thick card stock to place behind the vinyl so that light would not penetrate this area. You don't have to do anything with temp and fuel gauges.
Now put the gauges back together and enjoy ![]() You may have to play with them a few times to make sure everything sits flush.
You may have to play with them a few times to make sure everything sits flush.
- Kurt
P.S. I don't think Special X gauges are possible as the light will not penetrate the black. I will see if I can find my files to save people the hassle of scanning, reversing colours, etc... I would sell complete sets but they do take longer than one thinks... I'll have to think it over.
| By Kurt (207.6.125.193) on Saturday, February 07, 2004 - 02:19 pm: |
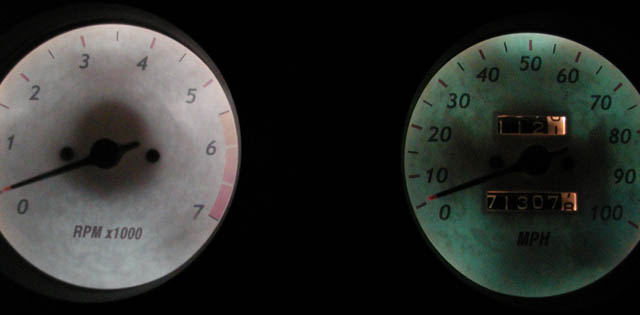
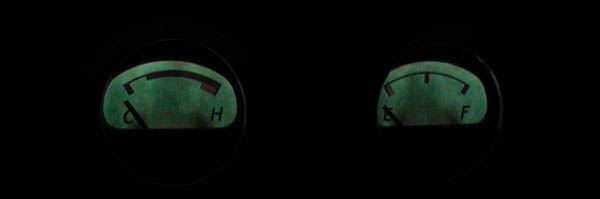
Brian, by your night shot it looks like those were printed out on paper or card stock? I tried that too and also had problem with lighting. I ended up using thin white vinyl sheeting for my gauge background to obtain a clear look when the light shines thorugh. I then cut out some circles with thicker card stock to block the hardware behind the face. I am still using the stock bulbs but with the white vinyl and it gives it an appearance similar to the indiglo gauges only its not as bright.
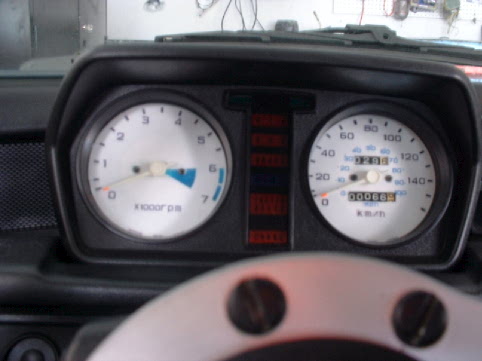
Here is what my gauges look like lit up at night:
| By Kurt (207.6.125.193) on Saturday, February 07, 2004 - 02:10 pm: |
Those are really nice Brian. I like the clean/unbusy look they have.
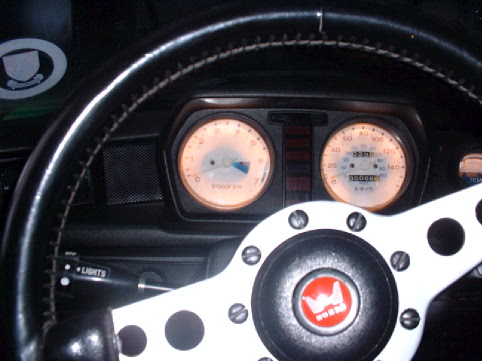
Here are some better shots of my white face gauges. IfF you look to the side you can see the faux carbon fibre that I used to replace the wood grain:
| By Chris Elder (211.30.173.156) on Thursday, February 05, 2004 - 11:20 pm: |
nah actually, im in sydney, but thanks for that.
pity ringwood isnt called aluminium :P
but yeah, im thinking i might just make up a custom setup with a sheet metal backing?
cheers guys.
| By Mike S (202.12.233.21) on Thursday, February 05, 2004 - 10:05 pm: |
Chris,
Another option for a 10k tach: VDO Australia used to make a 0 - 10k tach in 80mm panel mount profile which fits nicely in the existing instrument cluster (replace the temp/fuel gauges)
Ringwood Speedometer Services (in Ringwood funnily enough!) had a couple of old stock ones a couple of years ago - might be worth a try. They were around $150AUD (You're in Melbourne aren't you?)
VDO still produce an 80mm tach, but only in 0 - 7k rpm these days.
| By Chris Elder (211.30.173.156) on Thursday, February 05, 2004 - 07:59 pm: |
that gives me an idea...
if i can somehow get my hands on a HIGH quality (300dpi or more) scan of the face of the Type R gauges... then i'll be able to make my own :P
| By jms (66.242.1.165) on Thursday, February 05, 2004 - 04:11 pm: |
me too Brian
jared.stokes@goodfellow.af.mil
| By scholzj (128.193.178.131) on Thursday, February 05, 2004 - 02:51 pm: |
I would like a copy too. those look great.
Jeremy
scholzj@onid.orst.edu
| By Ted (63.224.195.169) on Thursday, February 05, 2004 - 09:38 am: |
Brian, those faces are just amazing, and your hard work paid off. Please send me a copy!
tedd@oslc.org
| By civic1200freak (68.202.198.146) on Thursday, February 05, 2004 - 07:27 am: |
What I was rambling on aboutwas the fact that our 1200's could rev to 10k+!
I thought that was a pretty cool fact on a motor 20-30years old.
Plus, wouldn't it be neat to see a factory looking tach(keeping the old school look)that looks like it was manufactered to correctly show 10k, and the red zone shifted up a bit?
To me the stock tach look is what I was after, but the type-r looks like it wont work due to differences in guage dia. Your original guages look like they would work better, since they are the same size.
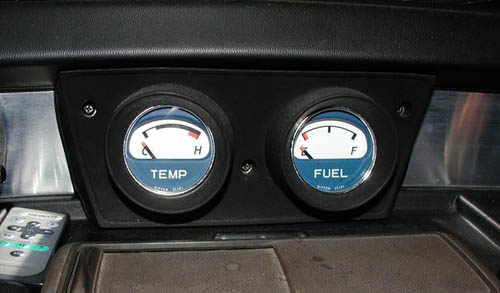
And the temp and fuel would be perfect in the aux guage cluster. Also paint the high zone red or a neon red or something. Your idea sounds like a great mod to me....Rick
| By Brian Wilborn (66.167.201.162) on Thursday, February 05, 2004 - 12:19 am: |
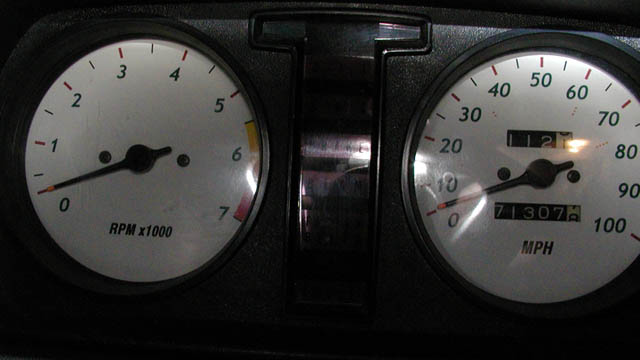
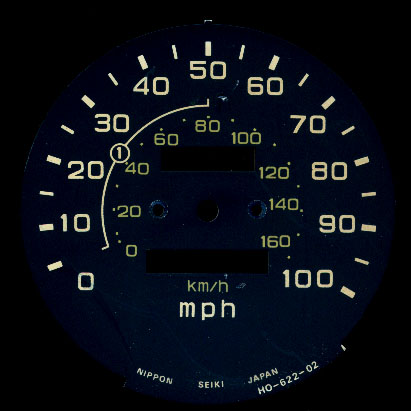
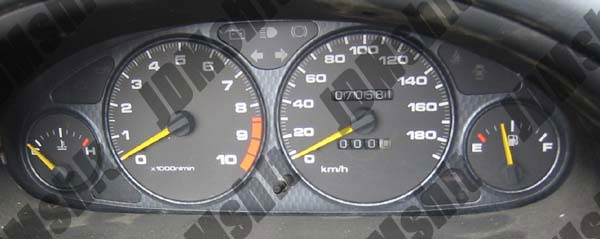
Here's some pics of my custom gauge faces that I whipped up. I used a combination of Corel Draw and Photoshop to achieve this. I first disassembled the gauges and removed the faces off of a spare set. I then scanned each face in (bottom three pics), took them into photoshop and cleaned up the image so I had a template to work with.
After I had the template files, I imported the JPEGs into Corel Draw. By using the original faces as a guide, I was able to make a raster image of the faces in Corel to maintain the accuracy of the gauges. Let me tell you, lining up the hash marks accurately took a LOT of work, but I finally got it.
The top pics are what the gauges look like in the daytime. The night shot of the Tach/Speedo was an experiment I was doing with lighting the gauges. As you can see, the original backlighting casts shadows where the gauge hardware is behind the face. The tach was achieved by using white LEDs (expensive experiment at 5$ a pop). This worked for a time, but I was unable to get the proper voltage to the LEDs and I kept burning them out within a matter of hours.
I have found a solution to the lighting problem however. I have a friend who has a source for electro-luminescent material that can be cut to custom shapes and sizes. It also comes in a variety of colors. This is the same material that all of the custom gauges are made of. My plan is to get some of this material (and the associated DC->AC power module) and fashion blank faces. Then it will be easy enough to print out the faces on a transparency and overlay the EL material with the face markings.
Another nice thing about the way I did this is that since the Corel Draw template is a raster file, I can change the typeface to anything I wish with minimal effort (I used Trebuchet MS for the ones in the picture, however I have recently changed it over to Square 721 BT for a more authentic look). I can also change the color of anything on the face with a couple of clicks.
I am leaving California to go live back in Colorado tomorrow, and I should have my Internet connection up some time next week. If anyone would a copy of my Corel file, I would be more than happy to send it to you (the whole file for all four gauges is only 25k). Feel free to pinch the template JPEGS if you want to try this yourself. The images are to scale and are very uselful for experimentation.
Cheers!
| By Brian Wilborn (66.167.201.162) on Thursday, February 05, 2004 - 12:03 am: |

| By Chris Elder (211.30.173.156) on Wednesday, February 04, 2004 - 11:23 pm: |
i dont know what civic 1200 was rambling on about, but all i know is i NEED a 10,000rpm tacho.
I will be changing between 8-10k rpm... no less.
so yeah, i need a high rpm tacho, but i just i dunno, i didnt want a Monster Tacho u know? and the type r civic one looks SAHWEEEEEET.
| By Kurt (199.212.150.16) on Wednesday, February 04, 2004 - 08:56 pm: |
So what do you guys think of the green.
Is it Heinekin enough ![]()
- Kurt
PS I'm at work right now I will get back to you on the white face guages. Maybe Randy can put it on his site?
- Kurt
| By lazy (210.10.240.86) on Wednesday, February 04, 2004 - 08:48 pm: |
Hey Jonathan.. what sort of place does the printing? I'd imagine it would be a fairly specialised practice. I just ask because I've been wanting to get my own gauge faces made up for quite a while now but haven't known where to start looking/asking.
| By chris ingham (Cingham) (65.179.240.169) on Wednesday, February 04, 2004 - 06:35 pm: |
i like the look too, but its going to be exposed if you don't have a way of enclosing it.
Ya the harness for the rear, then at least you can splice into it and try to make it work
| By jms (198.26.123.37) on Wednesday, February 04, 2004 - 03:09 pm: |
Bad a$$, I tried that on power point, it didnt come out that good, howd you do it, can you mail/email the software so I can make one, how much would ya charge, thats the way to go man.
| By Jonathan (68.193.10.141) on Wednesday, February 04, 2004 - 03:01 pm: |
Hey Kurt, did you use Photoshop for doing that? I was planning on doing the same thing, but I found a place that'll be able to print them out on a heavy plastic, so the light won't shine through the background, only the numbers. If you still have the file from when you scanned them in, would you be able to e-mail them to me? I was thinking about making special X faces.
| By Kurt (207.6.125.193) on Wednesday, February 04, 2004 - 11:38 am: |
I tried making a custom tac using using my own numbers as I wanted the white face gauges but I wanted then to read properly rather than having to do the math. I believe Justin used some backgrounds from a later Civic and they look awesome. They fit close but I think the tach is slightly off.
Anyway long story short making your own template is extremely difficult. I tried it sucked ![]()
You probably need a drafting program like AutoCad. However, with a scanner and Photoshop it can be done.
Here is the finished product, an exact mirror of the factory gauges but with colours reverted. Everything lines up perfect and the red in the gauges is now blue. The background light still penetrates them too. I was thinking of making these up and selling a few sets but it takes forever to make them even though the basic templates are done. I believe these are a first ![]()
Not the greatest pics but you get the idea:

| By civic1200freak (68.202.198.146) on Wednesday, February 04, 2004 - 06:53 am: |
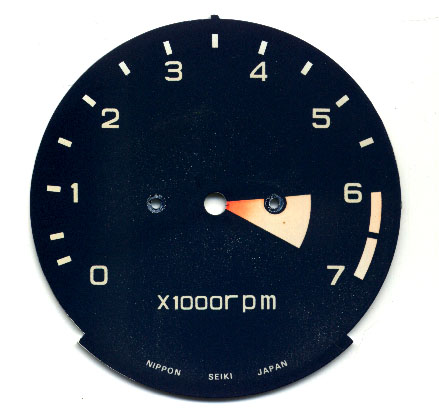
About 15 years ago, I met a freind (bob) out in Cocoa Fl. to show me his 78-79 1200. We then went for a test drive. With my friend, I brought along, (tom 200lbs)myself at 225, and bob at around 180lbs. The acceleration this thing had put the three of pinned in our seats. when I peeked over, to see the rpm he shifted at, it was close to 10g. Now, with that being said, and hard to believe as well, I remember perfectly his tach as I watched it climb.
So , with a stock tach in your head, or in front of you, we all know the red zone is from 6-7k rpm....Right? Well, if you pictured the tach over a clock, you would see 1000 rpm at around 9:00, 3-4 rpm at 12:00 and 7000 rpm at 4:00..........He was shifting at the 7:00 position.....and the needle never stopped. My point is, why not make a copy of a stock tach and change it so redline is higher than stock . Also, use the stock numbers as a jig to make 8k, and 9k. this way it looks stock, but we all know it's not. remember the thrill of getting into a car with a tach that redlines at 8-9k, like a type R......sorry for the ramblings , just an event that helped my interest in these cars. And a thought on tach mods
| By Chris Elder (211.30.173.156) on Wednesday, February 04, 2004 - 12:52 am: |
uhhhh, harness? haha yes. it wont look right at all, but i really like the look of the civic type R tacho :P
(id rather it than a monster tacho)
| By chris ingham (Cingham) (65.179.233.233) on Wednesday, February 04, 2004 - 12:48 am: |
if you can score the harness anything is possible. Won't look right, but anything is possible.
| By Chris Elder (211.30.173.156) on Tuesday, February 03, 2004 - 09:04 pm: |
I was thinking of buying a Civic/Integra Type R gauge cluster and putting it in my first gen civic. 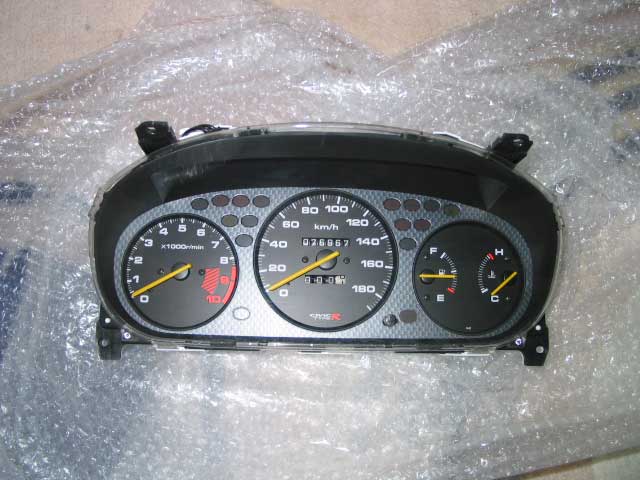
does anybody know of such a conversion done?
Does anybody know what I can do? ![]()
I just want a cool dash with a tacho and speedo / temp&fuel to match :P thats why i like the type r clusters.
| Administrator's Control Panel -- Board Moderators Only Administer Page |