


Project Gilles' 1977 1200 Honda Civic
-
gillesn
- Projects

- Posts: 13
- Joined: June 10th, 2010, 5:34 am

- Province/State: Bornem Belgium
- Model: 1977 Hatchback
Project Gilles' 1977 1200 Honda Civic
Hi,
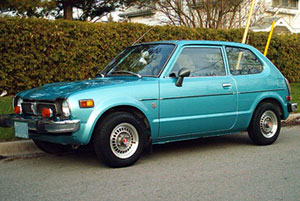
I'm restoring my '77 civic to get him road legal again. The women who I bought the car from had been using it for more than 30 years.
All in all the car is in pretty decent condition. An almost perfect interior, but as most European civics it had some pretty nasty rust under the hood.
Started the restoration this summer. Here are some pictures how the car was and is at this moment.
The engine cleaned and taken out
rust, rust and more rust
I'm restoring my '77 civic to get him road legal again. The women who I bought the car from had been using it for more than 30 years.
All in all the car is in pretty decent condition. An almost perfect interior, but as most European civics it had some pretty nasty rust under the hood.
Started the restoration this summer. Here are some pictures how the car was and is at this moment.
- 1
- Attachments
-
-
-
gillesn
- Projects
- Posts: 13
- Joined: June 10th, 2010, 5:34 am
- Province/State: Bornem Belgium
- Model: 1977 Hatchback
Hi everyone, long time no see.
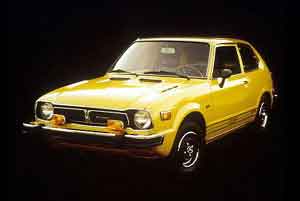
At this moment the car is as good as ready. He only had some severe rust at the nose, and one or two spots in the back.
Here are some more pictures I took during restoration:
Dealing with the rust:
As the car is a 1977 model I wasn't able to mount the strut cartridges that were delivered with the car. So I cut the struts open and converted them to open able ones, works like a charm.
Getting the car ready for painting. Found two new fenders as the old ones were completely rotten.
New paint job, back to the original yellow
Mounting everything back into place.
Installing a new window defroster kit at the back. Ordered a set from frostfighter but it wasn't a straight fit as the back window of the civic was too small. The copper strips must be at least 103cm long but the civics window only measured 90 at the top so the current running trought de wires would probably blow the fuse. I used a different grid layout than the one proposed by frostfighter. Will take some more pictures of anyone is planning to install this kit also
just have to cut the excess of the wires. Installed and tested it yesterday and everything works fine.
gr
Gilles
At this moment the car is as good as ready. He only had some severe rust at the nose, and one or two spots in the back.
Here are some more pictures I took during restoration:
Dealing with the rust:
gr
Gilles
-
gillesn
- Projects
- Posts: 13
- Joined: June 10th, 2010, 5:34 am
- Province/State: Bornem Belgium
- Model: 1977 Hatchback
Frostfighter offers 3 complete defroster kits
http://frostfighter.com/prt2600.htm
I bought no 2612 which includes 12 grid lines, so I will have two for spare. They also include a complete wire harness, timing switch etc but I used the original Honda wires and switch as I find this much better looking.
The grid lines are delivered on rols of 4 that are also pre-aligned (look at the pictures on their site), good when you have a window without previous grid marks but because the old lines were still somewhat visible you will have to cut them into separate lines and mount each line separately where the old one went.
Here is some explanation about the grid layout.
The only problem with this layout is that one grid contact ends at the top left corner (when looking from behind) instead of bottom left corner. I'm planning to drill a small hole in the top left corner of the hatch and run an extra wire from below to the top.
I will take some more pictures today so you can see how it looks on the car.
All in all it costed me 50eur. and about 3 hours of my time.
http://frostfighter.com/prt2600.htm
I bought no 2612 which includes 12 grid lines, so I will have two for spare. They also include a complete wire harness, timing switch etc but I used the original Honda wires and switch as I find this much better looking.
The grid lines are delivered on rols of 4 that are also pre-aligned (look at the pictures on their site), good when you have a window without previous grid marks but because the old lines were still somewhat visible you will have to cut them into separate lines and mount each line separately where the old one went.
Here is some explanation about the grid layout.
I will take some more pictures today so you can see how it looks on the car.
All in all it costed me 50eur. and about 3 hours of my time.
Last edited by gillesn on July 9th, 2011, 1:07 pm, edited 1 time in total.
-
gillesn
- Projects
- Posts: 13
- Joined: June 10th, 2010, 5:34 am
- Province/State: Bornem Belgium
- Model: 1977 Hatchback
We used a turning machine to cut of the top of the old strut but a simple saw would just do the trick as you only need it to cut of the top.anargyre wrote: Also about the struts' conversion: what kind of material did you need to make them open able ones?
Then we used a turning machine to make a custom nut to weld on top of the cut open strut were the cartridge screw screws into.
At the bottom of the strut the cartridge was a tight fit and at the top we mounted an o-ring that ensured a close fit in the nut.
-
gillesn
- Projects
- Posts: 13
- Joined: June 10th, 2010, 5:34 am
- Province/State: Bornem Belgium
- Model: 1977 Hatchback
A few more detail pictures of the window defroster. Cut the excessive wire too.
You can see the old grid lines even when you scraped them off. The conductivity is gone so that's the most important.
Last edited by gillesn on July 10th, 2011, 3:43 am, edited 2 times in total.
-
Randy

- Administrator

- Posts: 1450
- Joined: April 7th, 2005, 9:06 pm

- Province/State: Ontario
- Hometown: Ajax
- Model: 1978 Hatchback
gilles' 1977 1200 Honda Civic Project
Another Nice Restoration, I thought my car was holy, very nice work @gillesn
I like the mod on the strut, I am wondering how it is holding out.
I like the mod on the strut, I am wondering how it is holding out.
