


Project Project My modest
1979 refresh
-
slow_and_ugly
- Short Shifter

- Posts: 55
- Joined: October 10th, 2016, 6:35 pm

- Province/State: Alberta
- Hometown: Edmonton
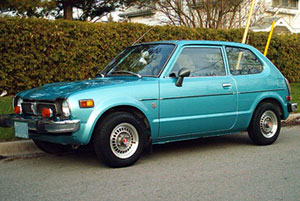
- Model: 1979 Hatchback
My modest project
The winter weather and an unheated garage has kept me from working on the door lock silencer, but it hasn't kept me idle. I have reupholstered my driver's seat.
The seat had typical cracks and splits in the vinyl.
The worst feature though, was that the seat sagged. I feared the foam was totally broken down but when I took the seat the seat apart I found that the foam was pretty much okay except for a split along the bottom where there was thin trough to allow a series of springs to pass through and hold down the seat bottom. The split allowed all the weight to press against a single cross spring which couldn't support it.
I reinforced the seam with a piece of leather I had left over from the steering wheel cover (never throw anything away!) and covered the bottom with a piece of canvas.
The canvas should help distribute the weight.
I considered many options for the seating material. In the end I wanted to keep the simple nature of the interior and decided to keep it black. I did a brief search for a replacement for the original vinyl weave but I remembered how much I detested it back in the day and opted for a black faux suede.
When the fabric arrived I found that I preferred the back side of cloth to the front. The back had a simple ribbed texture that reminded of the seats of my former 91 Si. SO I used the back. It made it a little more difficult as I them had to deal with the alignment of the ribbing, but it wasn't that big a deal.
I used the old pieces of the seat as guides to cut the new pieces. The outside piece of the seat back was too long so I had to cut it out in two pieces. The assembly was straight-forward. Just match up the edges and sew together. A bit of trial and error, but that's essentially it.
This is the result:
Not exactly perfect, but not a disaster either.
I reused all the foam and hardware. All the vinyl pieces except the back of the seat, the skirt at the bottom, and the piping have been replaced. I am encouraged enough to continue. The next task will be to do the passenger seat and the back seats to match although those seats are in very good condition.
The seat had typical cracks and splits in the vinyl.
The canvas should help distribute the weight.
I considered many options for the seating material. In the end I wanted to keep the simple nature of the interior and decided to keep it black. I did a brief search for a replacement for the original vinyl weave but I remembered how much I detested it back in the day and opted for a black faux suede.
When the fabric arrived I found that I preferred the back side of cloth to the front. The back had a simple ribbed texture that reminded of the seats of my former 91 Si. SO I used the back. It made it a little more difficult as I them had to deal with the alignment of the ribbing, but it wasn't that big a deal.
I used the old pieces of the seat as guides to cut the new pieces. The outside piece of the seat back was too long so I had to cut it out in two pieces. The assembly was straight-forward. Just match up the edges and sew together. A bit of trial and error, but that's essentially it.
This is the result:
I reused all the foam and hardware. All the vinyl pieces except the back of the seat, the skirt at the bottom, and the piping have been replaced. I am encouraged enough to continue. The next task will be to do the passenger seat and the back seats to match although those seats are in very good condition.
-
skiline900
- Member

- Posts: 21
- Joined: February 19th, 2013, 5:49 pm
- Province/State:
My modest project
Seat looks really good.
When you did the compression test how did you narrow it down to valves and not piston?
What valve work did you have done?
When you did the compression test how did you narrow it down to valves and not piston?
What valve work did you have done?
-
slow_and_ugly
- Short Shifter
- Posts: 55
- Joined: October 10th, 2016, 6:35 pm
- Province/State: Alberta
- Hometown: Edmonton
- Model: 1979 Hatchback
My modest project
as per valves: Basically it came down to a guess. When hand turning the crank you could hear a hiss as the #3 piston came TDC. There was no oil burning so I figured the rings were okay and just went for it.
As far as remember the head went to the machine shop, the #3 exhaust valve and 2 valve guides were replaced.
It basically came out of the garage and was parked for the winter so I can't say for sure I got it right. But it was running nice.
As far as remember the head went to the machine shop, the #3 exhaust valve and 2 valve guides were replaced.
It basically came out of the garage and was parked for the winter so I can't say for sure I got it right. But it was running nice.
-
steve.ewing@ottawa.ca

- Projects

- Posts: 529
- Joined: September 15th, 2009, 12:41 pm
- Province/State: Ontario
- Hometown: Kemptville
- Model: 1976 Hatchback
My modest project
Do a compression test - record the numbers.skiline900 wrote: ↑February 7th, 2018, 4:33 pmWhen you did the compression test how did you narrow it down to valves and not piston?
Add a bit of oil to each cylinder.
Do another compression test.
If the pressure in 1 or more of your cylinders increases, you have cylinder issues.
If the readings don't change, you have head issues.
-
steve.ewing@ottawa.ca
- Projects
- Posts: 529
- Joined: September 15th, 2009, 12:41 pm
- Province/State: Ontario
- Hometown: Kemptville
- Model: 1976 Hatchback
My modest project
Nice job on the seat!
-
slow_and_ugly
- Short Shifter
- Posts: 55
- Joined: October 10th, 2016, 6:35 pm
- Province/State: Alberta
- Hometown: Edmonton
- Model: 1979 Hatchback
My modest project
And then there were two....
Again, not perfect, but usable. The second one was much easier as only the seating surface had to be changed. I am not sure if the wrinkles are caused by the insert being crooked or the seat cover needing a tug here and there. It was't wrinkled before it went on the frame.
-
slow_and_ugly
- Short Shifter
- Posts: 55
- Joined: October 10th, 2016, 6:35 pm
- Province/State: Alberta
- Hometown: Edmonton
- Model: 1979 Hatchback
My modest project
I gave up looking for a right side exterior mirror. The only one I ever found was going for over $400. I have ordered a set of 'Ital' style from the UK. I think they'll look okay.
I am now looking for a set of fog lights. Not for driving so much as looking cool.
I am now looking for a set of fog lights. Not for driving so much as looking cool.
-
slow_and_ugly
- Short Shifter
- Posts: 55
- Joined: October 10th, 2016, 6:35 pm
- Province/State: Alberta
- Hometown: Edmonton
- Model: 1979 Hatchback
My modest project
Finally finished the rear seat. It's still covered with pieces of the backing that totally disintegrated and made a big mess.
I learned a lot doing this. I could probably do a decent job now.
Now where was I before winter so rudely interrupted? Oh yeah....door lock....
Now where was I before winter so rudely interrupted? Oh yeah....door lock....
-
tviracing

- PanaSport

- Posts: 211
- Joined: March 14th, 2011, 7:13 am
- Province/State: London
My modest project
these are probable what you are looking for for your door lock
i have been making these in proper rubber for a few years now and they work just fine
these are not 3D printed ones that break
£25 pounds sterling per pair free shipping anywhere in the world
regards
slim
i have been making these in proper rubber for a few years now and they work just fine
these are not 3D printed ones that break
£25 pounds sterling per pair free shipping anywhere in the world
regards
slim
-
panchoyonions
- Member
- Posts: 25
- Joined: April 7th, 2018, 6:49 pm
- Province/State: Wisconsin
My modest project
Looking like your putting in some good work! Liking it! He what kind of sewing machine are you using for the
Upholstery
Upholstery
